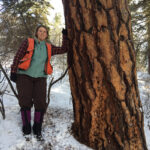
By Kamie Long, Western Slope Urban & Community Forestry Program Specialist
This guide will help you take care ofcontainer trees to reduce damage caused by girdling (circling) roots that occur from plants being in a hard–sided container for too long. In Part 1, you’ll learn how to find the root flare prior to planting the tree. In Part 2, you’ll determine the depth and width of the planting hole, then address any circling roots.
Also, remember to call 811 a few business days before digging to request the approximate location of buried utilities so you don’t unintentionally dig into an underground utility line.
Find the tree’s root flare before digging the hole and planting the tree.
Step 1: Find the Grafting Point
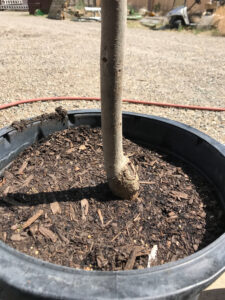
Container trees typically have too much soil over their root system. This is due to the ‘potting-up’ process done by nurseries as the seedling grows larger and is potted into larger containers.
The tree in Image 1 is currently planted too deep in the container. The bulge in the trunk at soil line is the grafting point. This is where the root stock was grafted to the desired tree species when the plant was very young. The root flare is not visible.
Image 1: A container tree with noticeable graft point. This is not the root flare.
Step 2: Manage Adventitious Buds
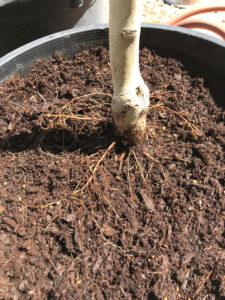
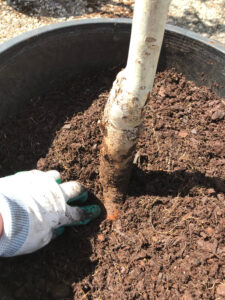
After digging in the soil, you’ll likely find roots growing from the trunk that aren’t part of the tree’s root flare.
In Image 2, the roots growing from the trunk are from adventitious buds (roots that grow from the stems or other tree part besides the root) that are normally dormant. These roots are growing due to soil and moisture being present against the trunk.
They can be left exposed and they will dry out and die, or you can remove them with a sharp pruning tool.
Keep digging to find the true root flare.
Image 2: The visible roots are growing from adventitious buds on the trunk. This is not the tree’s root flare.
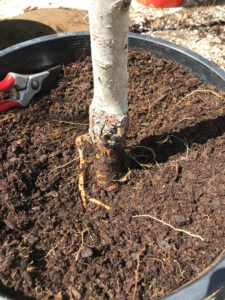
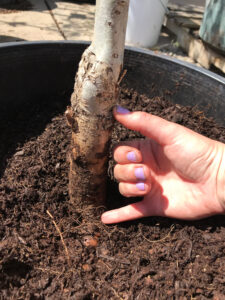
Step 3: Remove any Roots that Cross or Circle the Trunk
As the tree trunk and the root grow larger in size, the root can start to grow into the trunk. This may damage the tree’s vascular system, which moves food and water up and down the tree.
These roots are called girdling roots. They can encircle or confine the trunk causing significant crown die-back or tree death.
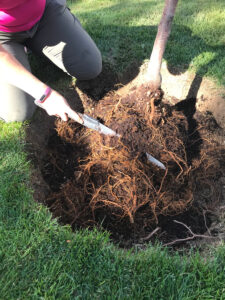
In Image 3, a root is shown growing next to the trunk. If this root is left in place, it will grow into the trunk causing damage to the trunk tissue. Simply cut the root with a sharp pruning tool at its point of origin on the trunk.
Some roots may be very thin in this area of the root ball, but all roots growing around or across the trunk need to be removed to prevent future issues.
Image 3: The root growing across the trunk is considered a girdling root. It needs to be removed to allow proper future trunk growth.
Step 4: Finding the Root Flare
Image 4 shows the root flare from the tree trunk. This is part of the tree’s original root system and is not an adventitious root.
Imagine a child’s drawing of a tree. The tree flares out at ground level; it does not grow straight into the ground like a telephone pole. This flare is what must be located before hole digging and tree planting. The flare is planted at or slightly above ground level.
Tree roots need oxygen to grow. By placing the root flare at or slightly above ground level when planting the tree, you give the tree the best opportunity to grow and thrive.
Image 4: The root growing off the trunk is part of the tree’s root flare. It is important that these roots are located prior to planting.
Step 5: Remove Soil Around the Root Flare
The tree’s original root flare can be many inches deep in the root ball.
By removing the soil above the root flare, it can shorten/shrink the size of the root ball. In most cases, it’s more important to locate the root flare than to worry about the size of the root ball. If the root ball becomes too small, you may consider returning the tree to where you purchased it and selecting a new tree.
In Image 5, the root flare was located approximately 3 inches below soil level. There were many adventitious roots and girdling roots growing above this point that were removed.
Now that the root flare has been identified, the depth of the planting hole can be determined. This should be measured from the bottom of the root ball to the root flare. The root flare should sit slightly above soil grade, this is done to prevent the flare from moving below soil grade as the soil settles after planting.
To learn the next step in tree planting, read Part 2.
Image 5: Approximately three inches of soil and roots were removed to locate the tree’s original root flare.
Part 2: Shave the Root Ball
Once you have identified the tree’s root flare (Part 1) there are still a few steps you need to take before planting the tree. First,determine the depth and width of your planting hole. Next, address any circling roots in the root ball.
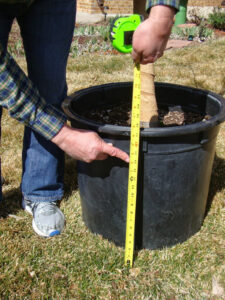
Step 6: Measure the Depth of the Planting Hole
To determine the depth of the planting hole, you can either remove the container or leave it in place. Either way, you need to measure from the bottom of the root ball to the root flare. Use a stick, a measuring tape, or the handle of your shovel to determine the depth.
The tree’s root flare should sit slightly above ground level by 1-2 inches. Disturbed soil tends to settle as it’s watered and if a tree was planted at ground level, it may sink below grade as the soil settles. Planting above grade ensures the root flare stays above ground level.
Therefore, to find the proper planting hole depth, measure the root ball and subtract 1-2 inches to ensure your tree sits slightly above ground level.
The width of the planting hole should be 2-3 times the width of the root ball. New roots can grow into disturbed and loosened soil much easier than undisturbed and compacted soil. By loosening the soil around the hole, the tree can become established much more quickly.
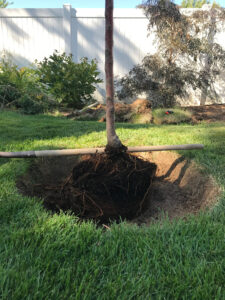
Image 6: Determine the depth of the planting hole by measuring the distance between the root flare and the bottom of the root ball.
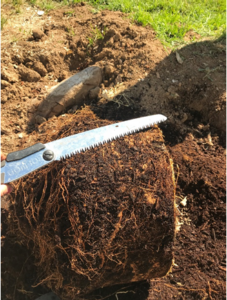
Step 7: Remove the Tree from the Container
When you remove the tree from the container, you’ll be able to see if there are any large roots you need to remove before planting.
Larger roots, like those seen in Image 8, should be removed using a sharp pair of pruners.
The cut should be made at the point before the root turns and begins circling the root ball.
Cut the portion of the root facing outward, so new roots will grow into the soil and not continue to grow in a circular pattern.
Do not slice through the root after it has begun to circle the root ball. Any new roots that will emerge from that slice will continue to grow in the same circling pattern and around the planting hole. It is important to make the cut so the new roots will face out and will grow into the soil.
Image 7: Remove the tree from the container.
Image 8: This is an example of a girdling root. It needs to be removed before planting.
Step 8: Remove the Outer Inch of Soil
By removing the outer inch of soil, your root ball may be more square-like than circular.
Do not tear the larger roots or make jagged cuts. If you come across larger diameter roots, use sharp pruners to make the cut. The cut should be before it starts to circle so the fresh roots that grow from the cut grow out into the soil.
Many tree failures we see now are now a result of girdling roots that weren’t addressed at the time of planting. These roots can act like a boa constrictor on the trunk, cutting off water and nutrient transport. Plus, circling roots (the existing ones) will not grow laterally into the site soil.
Image 9: Before planting the tree, the outside of the root ball must be shaved off to prevent circling roots.
Step 9: Shave Outer Root System and Remove Circling Roots
The old recommendation to address girdling roots was to take something sharp and slice through the roots, but research proved that was ineffective. It doesn’t change the direction of the new roots and they continue to circle the root ball and the planting hole.
The new recommendation is to shave off about 1 inch of the outer periphery of the root system and to physically remove the circling roots. This will encourage the tree to develop new roots growing out into the soil.
Make sure to use a shape blade to make these cuts. Most arborists have a dedicated saw when working with soil and shaving root balls.
When making these cuts, to reduce the amount of cleanup, place the tree in the planting hole. The edges of the root ball that are cut off can be used as backfill when planting the tree.
Image 10: Remove approximately 1 inch of soil from the outside of the root ball.
Step 10: Planting and Backfilling
Now that you shaved the root ball and cut back any girdling roots, the tree is ready to plant.
Check the tree from several angles and make sure it’s straight. The root ball should be sitting slightly above grade (1-2 inches). Then add your backfill (the soil). The rule of thumb is no more than 5 percent organic matter mixed in with the backfill.
If you add a “rich compost” to the backfill, the tree roots will not want to grow into the native soil as it will not be as desirable. Too much organic matter can be detrimental since it can hold too much water and decomposes more rapidly.
When you’re backfilling, do not put any soil on top of the root ball. You’ve gone through a lot of work to identify the root flare and plant the tree at the correct depth. Adding soil over the root ball now is undoing all the work you just did.
After adding the backfill, water gently to allow the soil to settle. Then add more backfill, water and repeat as necessary. You may have to do this several times to get the tree to final grade.
Image 11: Once the root ball has been shaved, ensure the root flare is placed at or slightly above the soil grade.
Step 11: Adding Mulch
Finally, add organic mulch. It helps keep weeds down, stabilizes soil moisture, and adds organic matter back into the soil as it breaks down.
Just like the backfill, keep all mulch off the top of the root ball. The mulch should come up to the edges of the root ball, no more than 3-4 inches deep, but not cover the top. Mulch on the top of the root ball won’t decrease the tree’s moisture requirements, but it can increase the potential for circling roots and allows moisture to sit against the trunk.
Grass should be kept away from the trunk. This prevents damage from lawn maintenance equipment.
When you’re finished, you should clearly see the root ball, which makes it easy to water, since you can focus your efforts for the first season on just watering the root ball.
After a season or two, start watering the planting hole and beyond since the roots will be growing outward from the trunk.
The rule of thumb for newly planted trees is to apply 1-2 gallons of water per inch trunk diameter as needed (don’t let things dry out), approximately 3-4 days/week, depending on the temperature and wind.
Image 12: Do not place any mulch over the root ball. Keep grass away from the trunk to prevent damage from lawn maintenance equipment.
Step 12: When and How to Stake a Tree
Staking can damage the tree if done improperly or left on for too long.
There are really only three reasons to stake following planting: windy sites, near people activities, or for a tree that cannot support its own weight. For the most part, a tree in a homeowner’s yard should not need to be staked. Stakes should be left in place for only one growing season (1-year).
If you decide to stake the tree follow some simple guidelines:
Use fabric straps around the trunk to prevent damage
Do not make the wires between the trunk and the stakes too tight
The tree needs to be able to move in the wind.
This will encourage the tree to grow strong roots and a strong trunk.
Remove all stakes and straps after one growing season.
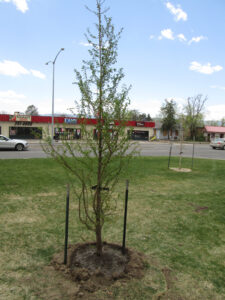
Image 13: Putting stakes on a tree for support is not always required. If you do use them, take them off after one growing season.
Congratulations! You now have planted and cared for yourcontainer tree to reduce damage caused by girdling roots and helped give the tree the best chance to grow and thrive.